
SocialRobot User's Manual
This user's manual explains all the various components of SocialRobot.
Table Of Contents
MUST READ
I'm sure you already know that but posting to social bookmarking sites is a complicated process. Usually it involves creating an account, confirming verification email, logging into account, posting bookmark and then checking if the link is actually present. Multiply that by 100 (or however many threads you are running) and you will soon see that countless things can go wrong. That's why we are giving you a checklist and our recommendations on how to properly and effectively use SocialRobot. If SocialRobot is acting strange or not reaching the expected success rate always refer to this checklist.
- Whitelist SocialRobot in your firewall and antivirus (if you have one installed). If any of those two is tampering with SocialRobot in any way (e.g. preventing SocialRobot from connecting to the internet or changing the contents of data), all sorts of problems can occur.
- Use Captcha services. There are lots of social bookmarking sites that require entering
captchas during registration and/or posting. If you don't you captcha services,
those sites will simply fail. Simple captcha solving is integrated directly into
SocialRobot but the success rate of solving captchas (specifically ReCaptchas) is
really low at the moment.
- Use dedicated/private proxies. SocialRobot supports all HTTP proxies but we highly recommend on using private ones since public proxies tend to die fast. And once they are dead, all connection attempts using that proxies will simply fail.
- Use Retry Options located in Options. A lot of things can go wrong during
actions (e.g. Captcha is solved incorrectly, used proxy is dead/blocked, etc.).
Using Retry Options will slow SocialRobot down a bit but it will also ensure
greater success rate. What this means is that in case of failure of registration
(or email confirmation or posting or any other action) SocialRobot will try
registering again. We recommend using at least 1 retry with at least 5s
delay for all major actions (registration, email confirmation, posting, link
verification). Even better use 2 retries with 15s delay.
- Use private email account in your projects. Public ones like Hotmail, Gmail, AOL are often blocked/blacklisted by social bookmarking sites and won't work.
- Use a fresh email account for each project (registration run).
If you use the same email account during registration process again ang again,
registration will fail as that email account has already been used before. It's
common sense you can't register 2 social bookmarking accounts with the same
email address.
- Wait between registration and email confirmation. We recommend on waiting for at
least a couple of minutes after registration to ensure all emails get delivered to your mailbox. Lots of
social bookmarking sites
tend to send confirmation mails with delay and some can take even up to a day.
- Don't go berserk on threads. 100 threads should be plenty enough unless you're
absolutely certain your computer (and internet connection) can handle the load.
User Interface
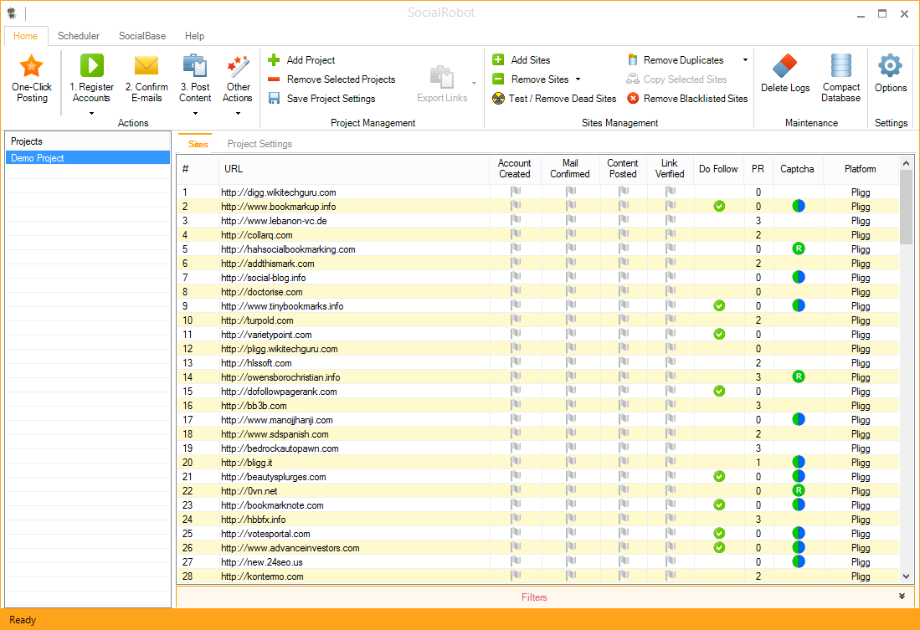
SocialRobot user interface consits of two parts: upper control area which is filled with ribbon tabs and controls that contain various buttons and lower part which content depends on currently open ribbon tab (for example when you're using »Home« tab, lower part will consist of projects list and current project sites and settings).
Home

This tab is the place where you will do all the project management and actions. When Home tab is selected, lower part of user interface will consist of project manager on the left side and sites manager/project settings on the right side.
Control area is made of the following ribbons: Actions, Project Management, Sites Management, Maintenance And Settings.
Actions
This ribbon is used, when you want to manually control the whole process from registration to social bookmarking sites to link verification (as opposed to automatic mode that is essentially realized by using a scheduler). First button is the One-Click posting button which does exactly what its name suggests - all you need to do is click it. SocialRobot will take care of the rest. If you want to control each step, use buttons marked with numbers from 1 to 3 (left to right) and that is the sequence they are meant to be used in. If you look at the buttons, you'll see that make sense – first you need an account, so you'll need to click »Register Accounts« button. After registration you will usually receive some kind of confirmation email and you'll confirm those emails by clicking »Confirm E-Mails«. Once those emails are confirmed, your account is all set for posting and that's when you'll click »Post Content«. The last button called »Other Actions« is where all other actions that are not a part of normal/typicall workflow reside.
As you know SocialRobot supports many platforms and not all of the described actions are always necessary for successful link building. As an example Pligg social bookmarking sites will need to have account created, then email confirmed and finally a bookmark posted. On the other hand some platforms can be directly posted to without registration and email confirmation.
» 1. One-Click Posting
Clicking this button is the easiest and the fastest way to get the social bookmarks. Once you've configured your project, clicking this button will register accounts, confirm emails, post to social bookmarking sites and verify the links. Nothing else needs to be done in this mode.
» 2. RegistrationThis action will create accounts on sites of the currently selected project. Once you click the button, you'll get presented with the following options:
- Automatically Determine Registrable SitesSocialRobot will automatically determine which sites need registration. This is the recommended and most efficient choice when registering.
- Register On All Unregistered SitesSocialRobot will register on all sites in the current project that don't yet have an account.
- Register On All Failed SitesSocialRobot will register on all failed sites in the current project.
- Register On All SitesSocialRobot will register on all sites in the current project.
» 3. Confirm E-mails
This action will log in to the mailbox specified for the current project, download all the messages and confirm them.
» 4. Post Content
This action will post content to sites of the currently selected project. Once you click the button, you'll get presented with the following options:
- Automatically Determine Postable SitesSocialRobot will automatically determine which sites to post to (for example it will not try to post to sites that require a valid account but don't have it). This is the recommended and most efficient choice when posting.
- Post To All Not Yet Posted SitesSocialRobot will post to all sites in the current project that haven't been previously posted yet.
- Post To All Failed SitesSocialRobot will post to all failed sites in the current project.
- Post To All SitesSocialRobot will post to all sites in the current project.
» 5. Verify Links
This action will verify links on sites of the currently selected project. Once you click the button, you'll get presented with the following options:
- Verify All Unverified SitesSocialRobot will verify links on all sites in the current project that haven't been previously verified.
- Verify All Failed SitesSocialRobot will verify links on all failed sites in the current project.
- Verify All SitesSocialRobot will verify links on all sites in the current project.
» 6. Other Actions
This is a list of other actions that you can use like site's PR checking, identifiying platform, etc.
- Check PRSocialRobot will check PR (Google PageRank) of sites in the current project. You can check PR Of Sites With Unknown PR or Of All Sites.
- Identify PlatformsSocialRobot will identify social bookmarking platform of sites in the current project. You can identify wiki platforms Of Sites With Unknown Platform or Of All Sites.
- Verify LinksSocialRobot will verify if social bookmarks are actually present on target sites. You can verify if link is present on »All Sites«, »All Failed Sites« or »All Unverified Sites« in the currently selected project.
Project Management
This ribbon is for all project management related tasks like adding or removing a project, saving settings and exporting links.
» Add Project
When you want to add new project, clicking this button will open a popup for adding new project.
» Remove Selected Projects
When this button is clicked selected projects will be removed. Note that you can select mulitple projects for removal.
» Save Project Settings
By clicking this button all changes to the current project (which are by the way managed in "Project Settings" tab) will be saved to the database and will stay there even after the restart of SocialRobot.
» Export Links
When you want to export links of the currently selected project to a file, clicking this button will present you with two options:
- Export Posted LinksThis option will export all the links of the sites where social bookmark has been successfully created. Note that sometimes even despite the successful posting, links aren't accessible to public and search engines. For example this happens when social bookmarking site requires for users to be logged in to view articles.
- Export Verified LinksThis option will export all the links of the sites where link has already been successfully verified.
Sites Management
This ribbon contains everything needed for managing sites of currently selected project.
» Add SitesThis will open a new window for adding sites to currently selected project. There are 3 options available for adding sites presented in 3 tabs: Standard, Import From File and Import From Another Project.
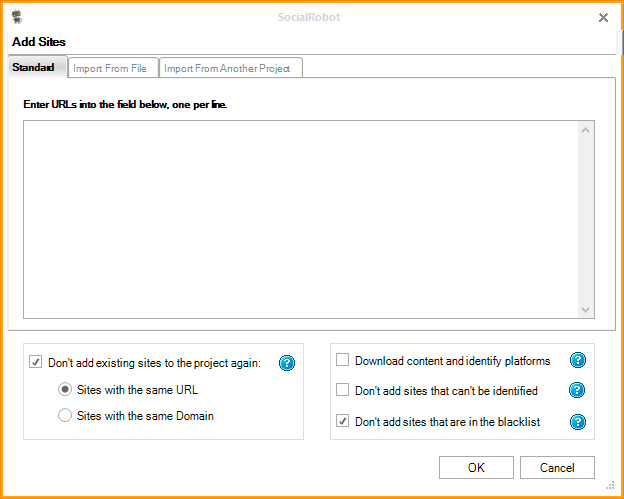
In standard mode sites are added by entering URLs line by line. There are a few options available at the bottom and are common for all three site adding modes:
- Don't add existing sites to the project againIf this is checked sites that are already present in the project (according to URL or Domain) will not be added to the project again. This is useful because normally you don't want to have duplicate sites in your project.
- Download content and identify platformsSocialRobot intelligently tries to figure out the platform without downloading all the content of the sites. That saves bandwith and time but it sometimes fails. If this option is checked, SocialRobot will download content of the site, analyze it and try to figure out the platform.
- Don't add sites that can't be identifiedIf this option is checked, SocialRobot won't add sites to the project for which it couldn't identify the platform.
- Don't add sites that are in the blacklistIf this option is checked, SocialRobot won't add sites that are in your blacklist. You can add sites to blacklist in Options / Blacklist tab.
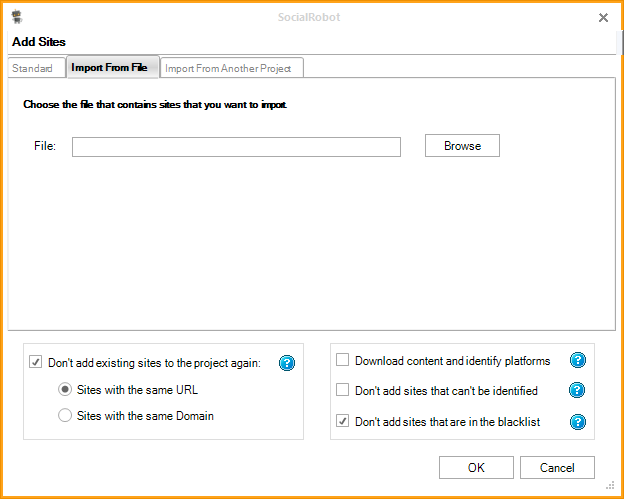
If you would like to import sites from a file, click Browse and choose file that contains urls of sites (each url in new line). Options at the bottom are described in Standard mode section.
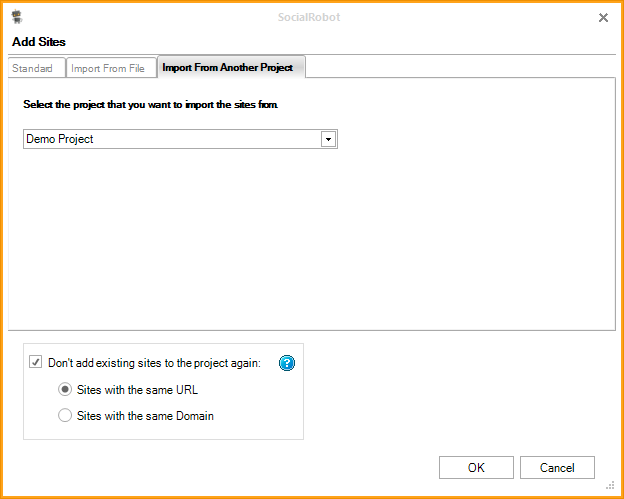
If you would like to import sites from an existing SocialRobot project, you can do that by choosing the project you want to import the sites from. Options at the bottom are described in Standard mode section.
Clicking this button will open a submenu where you can remove:
- Selected Sites
- All Sites
- Sites Where
- Registration Failed
- E-mail Verification Failed
- Posting Failed
- Link Verification Failed
SocialRobot will go through all sites in the current project and check if they are alive (alive means SocialRobot is able to connect to the site). If site is determined to be dead, it is removed from the project. It's a good idea to set a decent number of retries for this action (set in Options), especially if you're using proxies that aren't 100% working.
» Remove DuplicatesBy clicking this button you will get presented with two options: Remove Duplicate URLs (duplicate sites with the same URL will be removed) and Remove Duplicate Domains (duplicate sites with the same domain will be removed). Naturally 1 original site will always be left in the project.
» Copy Selected Sites
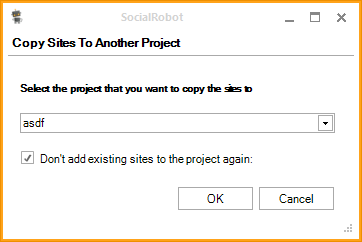
This will copy selected sites in the current project to another project. By clicking the button new window will open where you will be able to select the destination project.
» Remove Blacklisted SitesBy clicking this button all sites in current project that are in your blacklist will be removed.
Maintenance
This ribbon is used for Database maintenance.
» Delete LogsBy default database logging is turned off. If you turn it on, results (and also server responses if you choose full logging mode) will get saved to the database. Those logs consume space and can also fragment the database. Clicking this button will delete all the logs in the database and free space. It's a good idea to do this regularly unless you really need all the logs.
» Compact DatabaseIn time database will get fragmented. If you don't know what database fragmentation is, we'll make it simple: with fragmentation database becomes slower and less efficient. That is why we recommend that you compact your database every now and then.
Settings
There is only one button in this ribbon - Options. This is the place where all SocialRobot settings are
set.
Options are divided into 8 tabs.
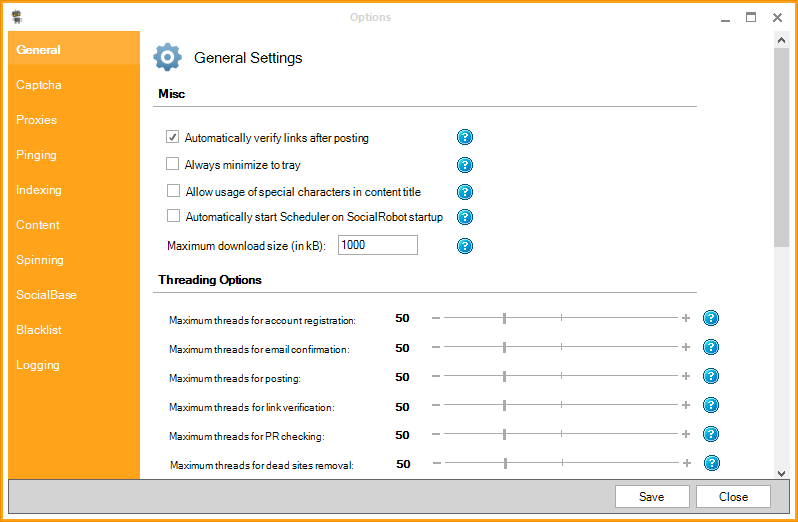
» Automatically verify links after posting
If this is checked, link verification will be automatically performed immediately after posting is completed. In case you enable automatic link verification, there's no need for 4th step (link verification) when scheduling jobs.
» Always minimize to trayIf you want SocialRobot to always minimize to system tray instead of taskbar, check this option.
» Allow usage of special characters in content titleSome platforms don't allow special characters like ?, !, & and others to be present in website title. That's why SocialRobot will prevent you from entering those by default. If you would still like to use those characters in title, check this option.
» Automatically start Scheduler on SocialRobot startupIf you want to automatically start Scheduler when SocialRobot starts, check this option.
» Maximum download sizeThis is the maximum size (in kB) that is still allowed during various processes (registration, posting, link verification). If the site exceeds this limit, it will be regarded as invalid. Since only html without pictures is downloaded, 1000 kB should be plenty enough for most sites.
» Threading optionsMaximum number of threads that will be used for desired action (each SocialRobot action has a maximum threads setting). Upper limit of threads is 200 (that's the database limitation of maximum simultaneous connections).
» HTTP timeout (Timeout Options)This is the maximum amount of time (in seconds) the thread will wait for a server response before declaring it as "not responding". Lower HTTP timeout you set, faster SocialRobot will work, but slow servers might not have enough time to respond because of that. Higher timeout you set, better the success rate will be. Recommended HTTP timeout is 60 seconds.
» Email confirmation delay (One-Click Posting Options)This is the amount of time (in seconds) SocialRobot will wait after registration before starting email confirmation. As some sites need more time to send confirmation mails, we recommended this to at least 120 seconds.
» Retry optionsIf an action for some reason fails, SocialRobot can retry it. Set the number of retries for each action to the desired value. If you would like SocialRobot to pause before each retry, set delay (in seconds in 5s steps) value. It's a good idea to set these to at least 1 as there are lots of reasons why an action could fail (bad proxy, server timeout, wrong captcha result, etc.). This way success rate will be higher.
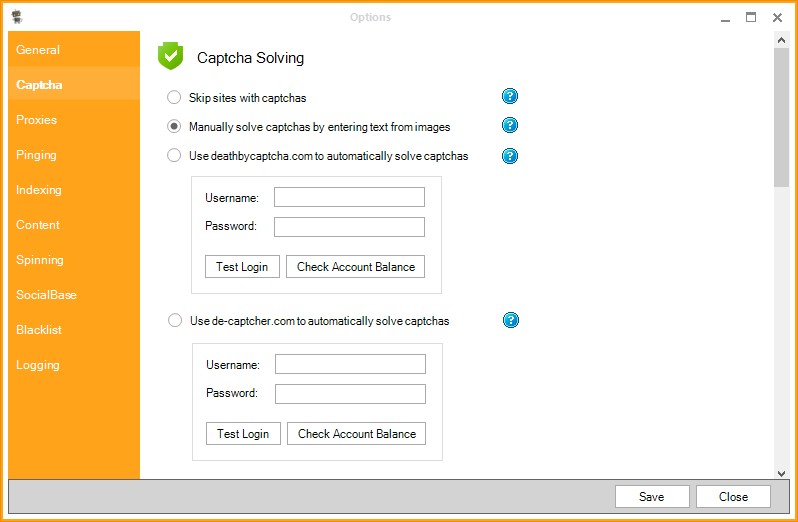
» Skip sites with captchas
Skip sites that require captcha input.
» Manually solve captchas by entering text from imagesManually solve captchas by entering text from images. If this option is selected, you'll be presented with popups displaying images that need to be solved.
» Use deathbycaptcha.com to automatically solve captchasUse deathbycaptcha.com to automatically solve captchas. You need deathbycaptcha.com account and a positive balance to use this service.
» Use de-captcher.com to automatically solve captchasUse de-captcher.com to automatically solve captchas. You need de-captcher.com account and a positive balance to use this service.
» Use Imagetyperz to automatically solve captchasUse Imagetyperz to automatically solve captchas. You need Imagetyperz account and a positive balance to use this service.
» Use Spamvilla to automatically solve captchasUse Spamvilla to automatically solve captchas. You need Spamvilla account and a positive balance to use this service.
» Use Captchtronix to automatically solve captchasUse Captchatronix to automatically solve captchas. You need Captchatronix account and a positive balance to use this service.
» Use MegaOCR to automatically solve captchasUse MegaOCR to automatically solve captchas. You need a working MegaOCR account to use this service.
» Use Captcha Sniper to automatically solve captchasUse Captcha Sniper to automatically solve captchas. You need to enable CSSE with Decaptcher Socket Api enabled listening on port 3456 in Captcha Sniper.
» Use GSA Captcha Breaker to automatically solve captchasUse GSA Captcha Breaker to automatically solve captchas. You need to enable "Run as Webserver", "Listen on" 127.0.0.1 and "Port" 80 in Options of GSA Captcha Breaker.
» Popup question type captchas when using captcha solving servicesMost captcha solving services cannot and won't solve question type captchas. If you would like to solve those on your own, check this option.
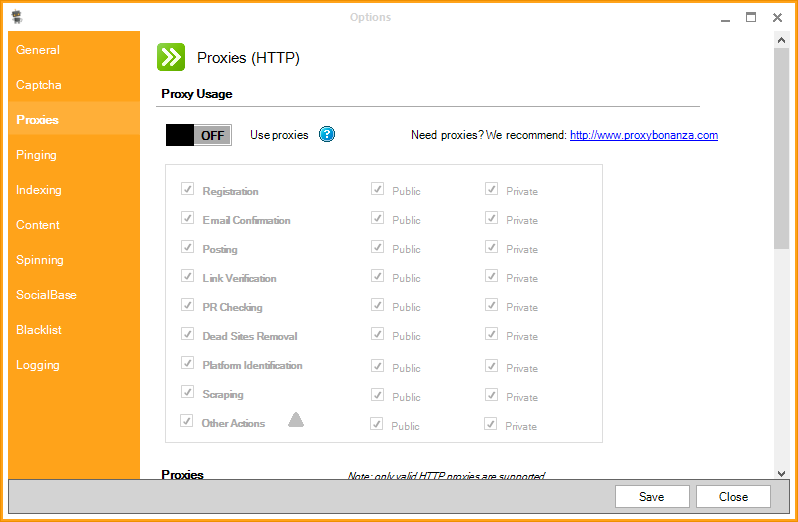
» Use proxies
If you want to use proxies during SocialRobot actions set this to ON. This is a global switch - if it's set to ON, proxies will be used, if it's set to OFF proxies will not be used regardless of other settings below.
» Public / Private settings for actionsWhen adding proxies, each proxy can be marked either as Private or Public (default). This is a feature meant for segmenting proxies. Let's say you have a bunch of public proxies and just a few, high quality private proxies. Typically you would use public proxies which are not that reliable for actions that are not that important (i.e. PR checking) and use reliable private proxies for actions that are important (i.e. registration, posting, etc.). You can set what set of proxies (Private, Public, both or none) SocialRobot should use for each action by checking those checkboxes.
» Periodically load proxies from a fileSocialRobot can periodically load proxies from a file. This feature is useful if you have a dynamic supply of proxies that changes all the time (i.e. when you are scraping your own proxies 24/7 and saving them to a file). If this option is checked, SocialRobot will load all the proxies in the selected file and use them according to proxy usage settings. Proxies will be loaded each X minutes set by Refresh interval.
» Use proxies from the listIf thise is checked proxies you add to the list will be used according to proxy usage settings. Note that you can check both "Use proxies from the list" and "Periodically load proxies from a file" or just one of these.
» Test ProxiesAll proxies in the list will be tested and marked as dead or alive. Response time in miliseconds will also be measured and displayed in the list.
» Add ProxiesAdd proxies to the list by either entering them manually or loading them from a file.
» Remove ProxiesRemove selected proxies from the list (multiple proxies can be selected and removed in single action).
» Mark As PrivateIf you want to mark selected proxies as Private, use this button. Each proxy that isn't marked as Private is considered Public. Once a proxy is marked as private, a green check will appear right next to it in the "Private" column of proxy list.
» Unmark As PrivateIf you want to set selected proxies back to Public, use this button.
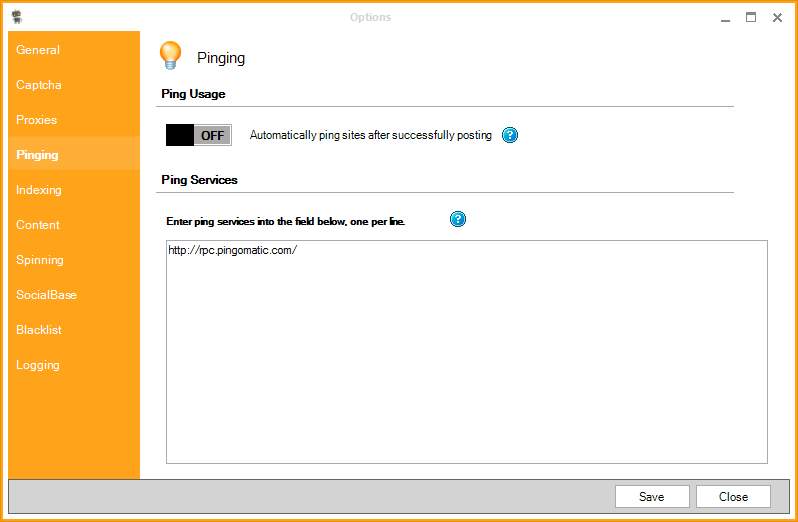
» Automatically ping sites after successfully posting
Pinging is a process of notifying various ping services that a new post has been made. If you want to enable pinging set this to ON. Pings will be sent immediately after posting. It's a good idea to use pinging when you want your posts to get crawled by search engine bots as soon as possible.
» Enter ping services into the field belowEnter ping services that you wish to send pings to one per line.
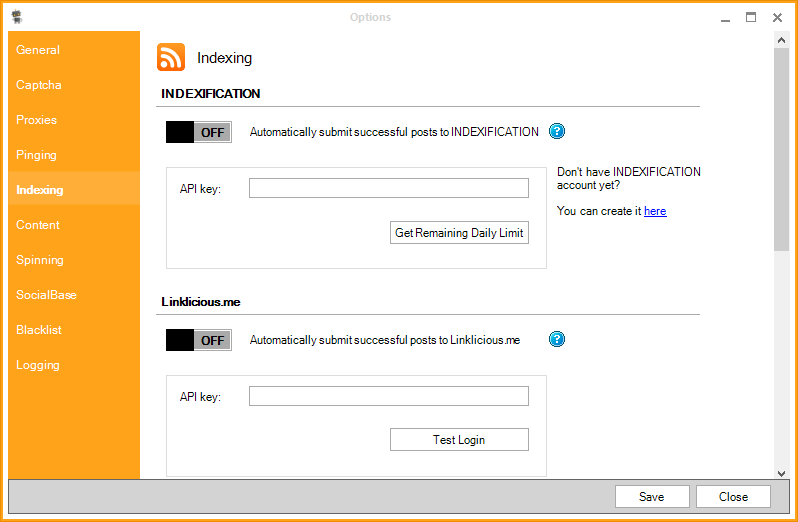
» Automatically submit successful posts to INDEXIFICATION
If this is ON SocialRobot will submit all successful posts to INDEXIFICATION indexing service after posting is completed. You need INDEXIFICATION account and a positive remaining daily limit to use this service. Don't forget to enter your INDEXIFICATION API key if you want to use this service.
» Automatically submit successful posts to Linklicious.meIf this is ON SocialRobot will submit all successful posts to Linklicious.me indexing service after posting is completed. You need Linklicious.me account and a positive remaining daily limit to use this service. Don't forget to enter your Linklicious.me API key if you want to use this service.
» Automatically submit successful posts to LinkPipelineIf this is ON SocialRobot will submit all successful posts to LinkPipeline indexing service after posting is completed. You need LinkPipeline account and a positive remaining daily limit to use this service. Don't forget to enter your LinkPipeline API key if you want to use this service.
» Automatically submit successful posts to Backlinks IndexerIf this is ON SocialRobot will submit all successful posts to Backlinks Indexer indexing service after posting is completed. You need Backlinks Indexer account and a positive remaining daily limit to use this service. Don't forget to enter your Backlinks Indexer API key if you want to use this service.
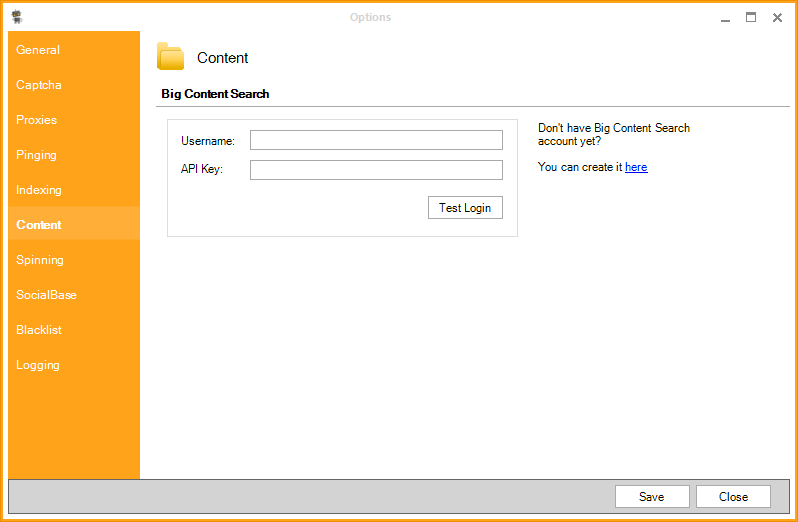
» Big Content Search
By setting up Big Content Search account, SocialRobot will automatically pull description and title for the desired keyboard to your project (accessed by using Get Content / Download From Big Content Search button located in Project Settings). To use Big Content Search with SocialRobot enter your account Username and API Key.
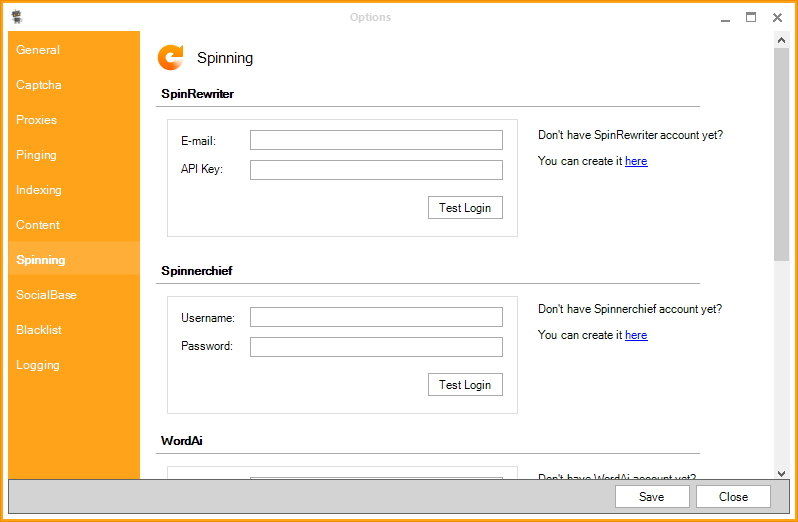
» SpinRewriter
To use SpinRewriter with SocialRobot enter your account E-mail and API Key. If you are unsure about either of those, please contact SpinRewriter support.
» SpinnerchiefTo use Spinnerchief with SocialRobot enter your account Username and Password. If you are unsure about either of those, please contact Spinnerchief support.
» WordAITo use WordAI with SocialRobot enter your account E-mail and Password. If you are unsure about either of those, please contact WordAI support.
» The Best SpinnerTo use The Best Spinner with SocialRobot enter your account Email and Password. If you are unsure about either of those, please contact The Best Spinner support.
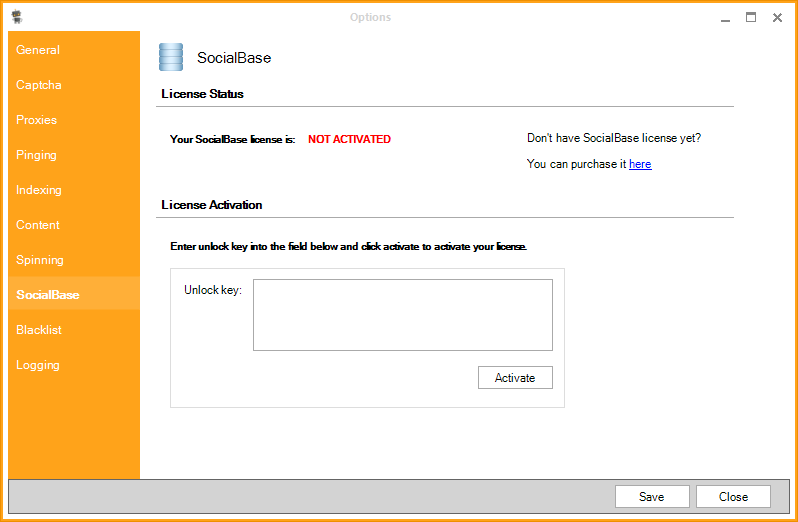
» License Activation
Once you have obtained your SocialBase unlock key, you have to enter it into »Unlock Key« field and click »Activate«. That will activate your license and you will be able to access SocialBase in "SocialBase" tab of SocialRobot.
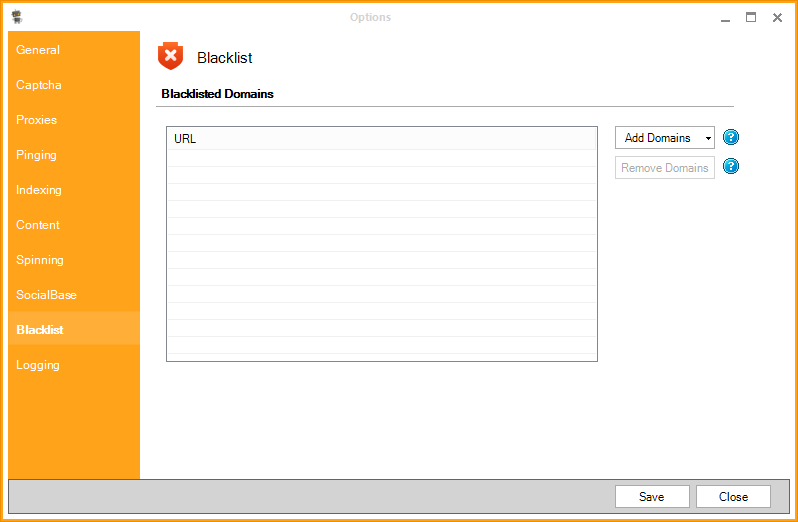
If there are social bookmarking sites you wish to prevent SocialBase from accessing (e.g. bad neighbourhood sites) you can list the domains here. Use the Add Domains button to either load the domains from file or enter them line by line. Use the Remove Domains button to remove selected domains from the blacklist.
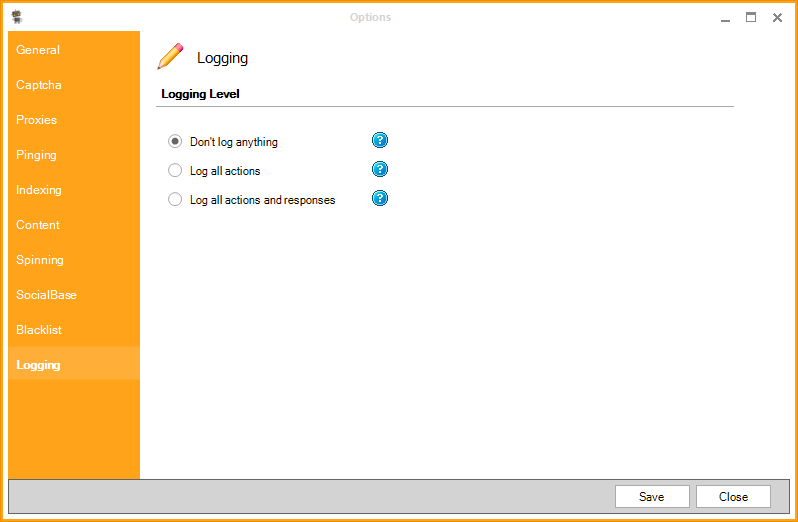
» Don't log anything
Nothing will be logged to the database.
» Log all actionsAll actions and action results will be logged (e.g. posting, trying to solve captcha, etc.) to the database.
» Log all actions and responsesAll actions, action results and server responses (in form of html) will be logged to the database.
Project Manager

Project Manager is basically a list of your current projects located on the left side of SocialRobot. By right clicking on the empty area of the list you'll get an option to either "Add Project" which will add a new project or "Remove All Projects" which will remove all current projects. Remember that you can also do both of these (and more) by using the buttons located in "Project Management" ribbon. If you right click on a project in project manager, you'll be able to "Rename Project", "Delete Project" or "Duplicate Project" which will create a copy of current project (including all the settings). When you duplicate a project you get to choose whether you want sites of current project to also be copied to duplicated project or not.
Sites Manager
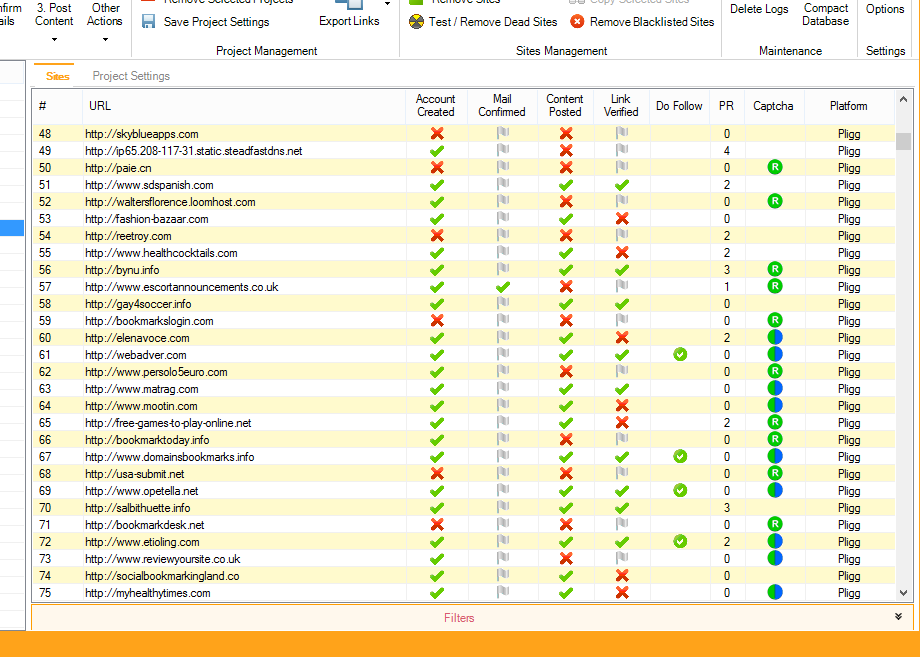
Sites manager is a list view of sites present in currently selected project. It contains the following columns:
- # - position in the list. This is just a counter for easier management is not really relevant for anything.
- URL - URL of the site.
- Account Created - status indicating whether account at this site has been successfully registered, it has failed or registration has not been attempted yet. This column will always contain one of the following icons that are also common for Mail Confirmed, Content Posted and Link Verified columns:
 - action has been performed successfully (e.g. account has been successfully created)
 - action has been attempted, but failed (e.g. registration has failed)
 - action has not yet been performed (e.g. registration has not been attempted for this site)
 - Mail Confirmed - status indicating whether verification for this email has been confirmed, confirmation has failed or confirmation has not been attempted yet.
- Content Posted - status indicating whether posting of social bookmark for this site has been successfully performed, posting failed or posting has not been attempted yet.
- Link Verified - status indicating whether social bookmarking link for this site has been verified, verification has failed or verification has not been attempted yet.
- Do-Follow - a green check (
 ) indicates this site is known to be Do-Follow. If there is no green check, it means this site is not Do-Follow or we haven't checked for its Do-Follow status yet.
- PR - indicating PR (Google PageRank) status of this site
- Captcha - status indicating whether a site has no captcha, has registration captcha, has posting captcha or has both registration and posting captchas:
 - this site has captcha present for account registration
 - this site has captcha present for social bookmark posting
 - this site has both registration and posting captchas present
 - Platform - platform of this site (e.g. Pligg, PHPDug, etc.)
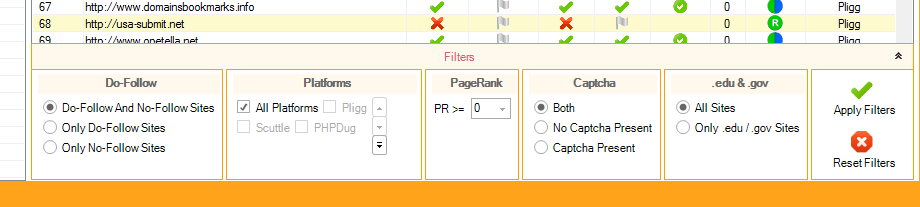 At the bottom of Sites Manager you will notice a little bar titled "Filters". Clicking it will expand it and allow you to filter sites of the current project. Note that performing filters doesn't delete or alter any sites. It simply "hides" sites that don't pass the filters. This is useful when you want to perform certain actions on exact subset of sites. E.g. you want to register and post only to Do-Follow sites. Or you want to register only on Pligg sites. Once you reset the filters, all sites of current project will be displayed again. You can apply the following filters:
- Do-Follow - show: Do-Follow And No-Follow Sites, show Only Do-Follow Sites or show Only No-Follow Sites
- Platforms - show sites of all platforms or show only sites of checked platforms.
- PageRank - show only sites that have PR greater or equal of selected value.
- Captcha - show, Both, sites that have captcha present and those that don't. Or only show sites that have No Captcha Present or that only have Captcha Present
- .edu & .gov - show All Sites or show Only .edu / .gov Sites (sites which are hosted on .edu and .gov TLD)
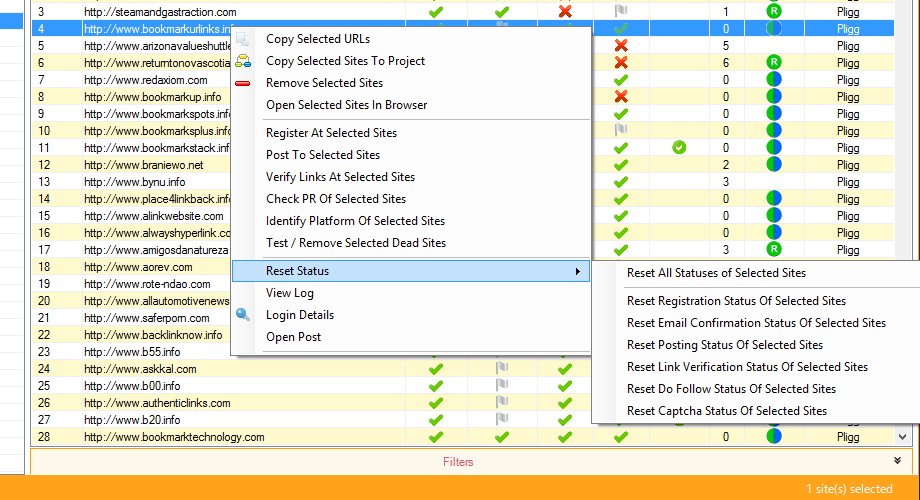 Right clicking a site in sites list will present you with a number of options:
- Copy Selected URLs - copies URL of selected site (or more sites) to clipboard
- Copy Selected Sites To Project - copies selected site(s) from current project to another project (selected in next step)
- Remove Selected Sites - removes selected site(s) from project
- Open Selected Sites In Browser - opens selected site(s) in a browser
- Register At Selected Sites - registers account on selected site(s)
- Post To Selected Sites - posts social bookmark to selected site(s)
- Verify Links At Selected Sites - verifies if links are actually present on selecte site(s)
- Check PR Of Selected Sites - check PR (Google PageRank) of selected site(s)
- Identify Platform Of Selected Sites - identifies platform of selected site(s)
- Test / Remove Selected Dead Sites - test and if dead removes selected site(s) from project
- Reset Status
- Reset All Statuses Of Selected Sites - resets all statuses of selected site(s)
- Reset Registration Status Of Selected Sites - resets registration status (Account Created column) of selected site(s)
- Reset Email Confirmation Status Of Selected Sites - resets email confirmation status (Mail Confirmed column) of selected site(s)
- Reset Posting Status Of Selected Sites - resets posting status (Content Posted column) of selected site(s)
- Reset Link Verification Status Of Selected Sites - resets link verified status (Link Verified column) of selected site(s)
- View Log - view action history for selected site (note that you need to have logging enabled in Options/Logging in order to record action results and responses)
- Login Details - once account is registered, clicking this will let you see username and password for that account
- Open Post - once social bookmark is posted, clicking this will open social bookmark in browser
Project Settings
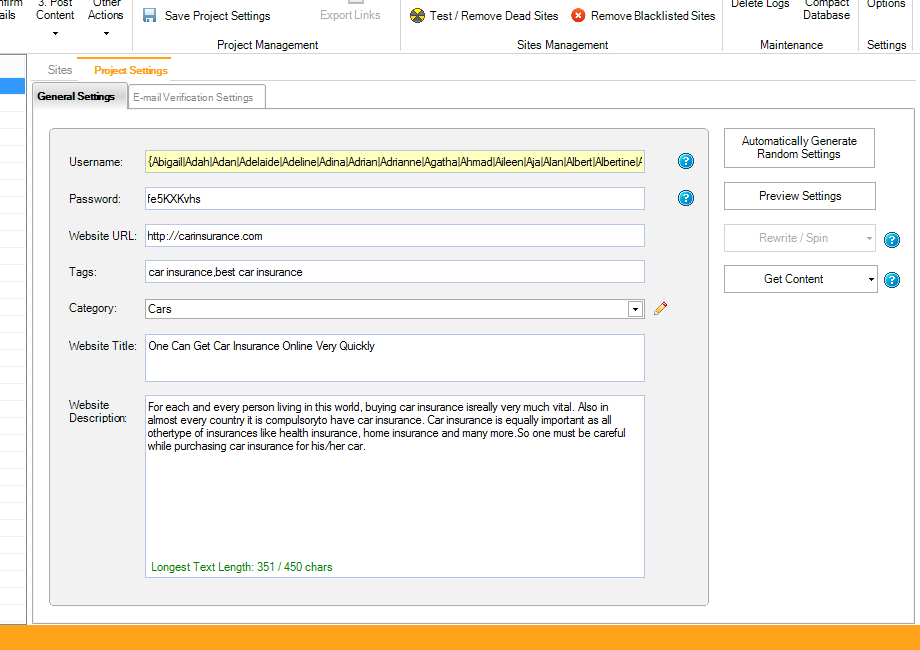
This is the place where you enter all the info for your project - e.g. account username/password, email settings, social bookmark url, title, description, etc. When creating a new project this should always be your first stop.
General Settings
These settings are used during registration of new accounts and posting social bookmarks. You need to fill all the fields in order for both to be successfull:- Username - this is a username that is goind to be used when registering a new account on the sites in your project. This field is spinnable (if you don't know what spinning is, please refer to this article: http://en.wikipedia.org/wiki/Article_spinning))
- Password - this is the password that is goind to be used when registering a new account on the sites in your project.
- Website URL - this is the URL of your website that you want social bookmarks to point to.
- Tags - these are tags that describe what your website is all about. You can add multiple tags, separated by comma (no space!). This field is spinnable.
- Category - this is the category of your website. You can manage (add/remove) categories by clicking little pencil icon right next to dropdown menu.
- Website Title - this is the title of your website (and social bookmark). It shouldn't be too long or too short (ideally between 5 and 10 words). This field is spinnable.
- Website Description - this is the description of your website (and social bookmark). Description must not be longer than 450 characters (there's indicator that will show you number of characters used right at the bottom of textbox) and should be at least 3 sentences long. This field is spinnable.
Buttons on the right side of General Settings will let you:
- Automatically Generate Random Settings - clicking this button will automatically generate a random value for: username, password, email address, tags, website title and website url. This is a good way to start configuring your project, but you should edit the values later on.
- Preview Settings - this will open a new window that will let you preview your project settings. Spun fields will be spun.
- Rewrite / Spin - by clicking this button and then choosing a spinning service (settings need to be entered in Options / Spinning in order to use this), SocialRobot will spin both website title and website description.
- Get Content - clicking this button will let you scrape content from one of article directories or built in services (settings need to be entered in Options / Content in case you want to use a service). In both cases you will enter a search keyword (possibly related to your website). SocialRobot will then find a suitable title and description and populate both fields.
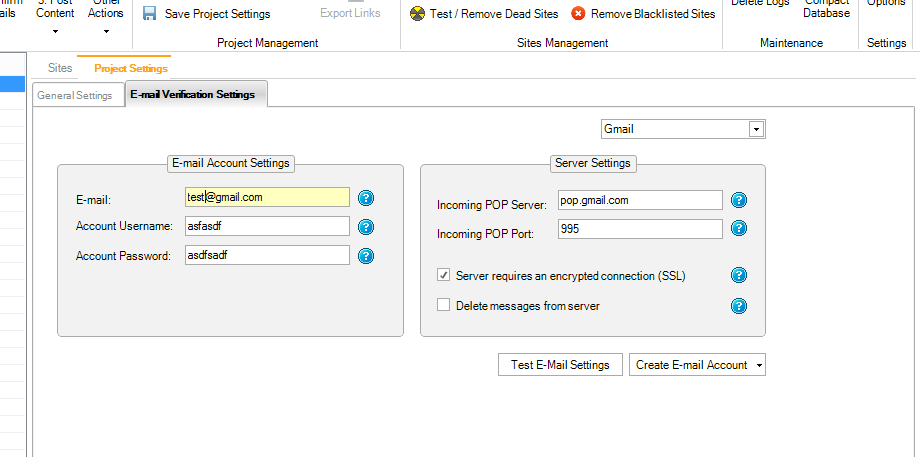
- E-mail - E-mail address that will be used during account registration. (e.g. john72@gmail.com)
- Account Username - username for this e-mail account. (e.g. john72)
- Account Password - password for this e-mail account. (e.g. johnnie)
- Incoming POP Server - address of incoming POP server for this e-mail account. (e.g. pop.gmail.com)
- Incoming POP Port - port of incoming POP server for this e-mail account. (e.g. 110)
- Server requires an encrypted connection (SSL) - if your POP server requires encrypted connection (SSL) check this checkbox.
- Delete messages from server - By default e-mails downloaded during e-mail confirmation are left on server which can lead to your account running out of space. Check this checkbox if you want to delete e-mails once they're downloaded and processed.
Scheduler
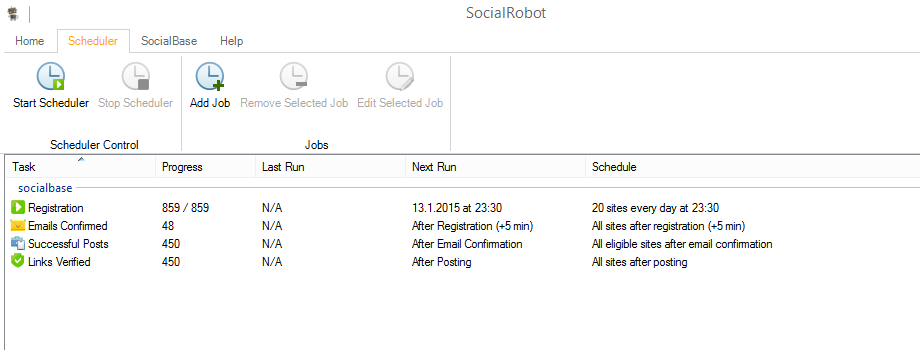
SocialRobot comes with a builtin scheduler that is very powerful and flexible. By using it you can schedule your jobs for the future and forget about SocialRobot - it will handle everything according to schedule. This is especially useful when you want to drip feed links instead of blasting them all at once (e.g. you can schedule SocialRobot to post 10 social bookmarks per day).
Ribbons at the top contain the following butons:
- Start Scheduler - this will start the scheduler. If scheduler is not started, jobs will not run. If scheduler is not started when jobs were supposed to be run, they will run once scheduler is started.
- Stop Scheduler - this will stop the scheduler.
- Add Job - add a new job. The whole process about adding new jobs is explained below.
- Remove Job - remove selected job.
- Edit Selected Job - if you wish to alter a job, select it and click this button.
Under the ribbon there's a list of added jobs (and their tasks). For each task (Registration, Emails Confirmed, Successful Posts and Links Verified) in a job, you are able to see the Progress (how many sites have already been processed), when was the task's Last Run, when is the task's Next Run and overall Schedule of the task. Right clicking a single task will allow you to run a certain task immediately (by clicking Run selected task) and to View job history which is esentially a log of all the history of what scheduler was doing inside the selected job.
Adding a job To add a new job, click the Add Job button in the ribbon bar. Then choose a project you wish to create a job for and click Next. Each project can only have one job attached which consist of any tasks. Next select tasks (Account Registration, Email Confirmation, Posting, Link Verification) you wish to include in the job. You can select only one task, all the tasks or any combination of the tasks - it's up to you, depending on what you want to achieve. In normal scenario tasks are typically serialized, meaning one happens after the previous one is completed.
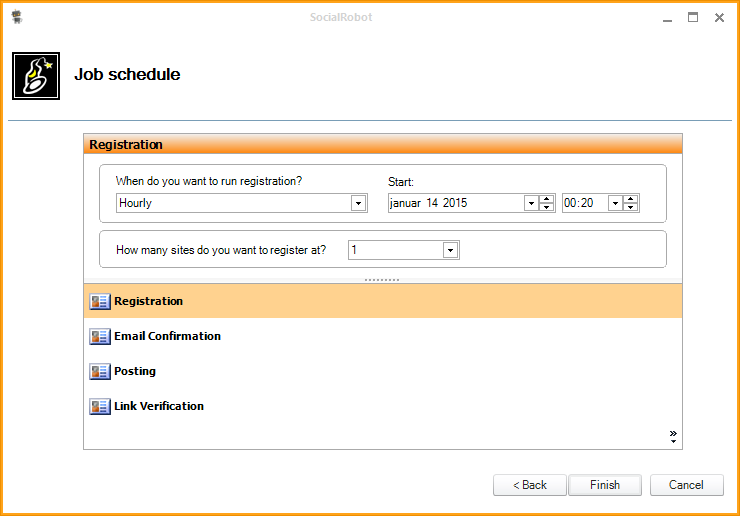
In the last step you'll get presented with the following screen (depending on which tasks you have chosen). There are several options available for each task, explained below:
-
Registration
- When do you want to run registration? - you can choose between: Hourly, Daily, Weekly, Monthly, One time. If you choose hourly that means registration for that job will run once per hour. Same goes for daily, weekly and monthly. If you want to run it only once and not periodically, choose "One time".
- Start - this indicates the date and time of first run of this task. The task will not run before this date/time. Once it's run for the first time, the task will repeat (or not) in accordance with "When do you want to run registration?".
- How many sites do you want to regiter at? - choose the number of sites you want to attempt registration at each time the task is run. E.g. if you want to drip feed 10 sites per period, choose 10 sites. If you want to blast all the sites at once, choose all the sites.
-
Email Confirmation
- When do you want to run email confirmation? - you can choose between: Hourly, Daily, Weekly, Monthly, One time. You can also choose between After registration completed which will start email confirmation right after registraion task is done. There's also an option to start email confirmation delayed in regards to registraion. If you choose this option you can set the delay (in minutes).
- Start - this indicates the date and time of first run of that task. The task will not run before this date/time. Once it's run for the first time, the task will repeat (or not) in accordance with "When do you want to run email confirmation?". This setting can't be applied if you chose to run email confirmation after another task (i.e. registration is completed).
-
Posting
- When do you want to run posting? - you can choose between: Hourly, Daily, Weekly, Monthly, One time, After email confirmation completed, After email confirmation completed (delayed), After registration completed, After registration completed (delayed).
- Start - this indicates the date and time of first run of this task. The task will not run before this date/time. Once it's run for the first time, the task will repeat (or not) in accordance with "When do you want to run posting?". This setting can't be applied if you chose to run posting after another task (i.e. registration/email confirmation is completed).
- How many sites do you want to post to? - choose the number of sites you want to attempt posting to each time the task is run. All eligible but not yet posted option means SocialRobot will post to all sites that it knows it can post to, but haven't done so yet.
-
Link Verification
- When do you want to run link verification? - you can choose between: Hourly, Daily, Weekly, Monthly, One time, After posting completed, After posting completed (delayed).
- Start - this indicates the date and time of first run of this task. The task will not run before this date/time. Once it's run for the first time, the task will repeat (or not) in accordance with "When do you want to run link verification?". This setting can't be applied if you chose to run it after another task (i.e. posting).
SocialBase
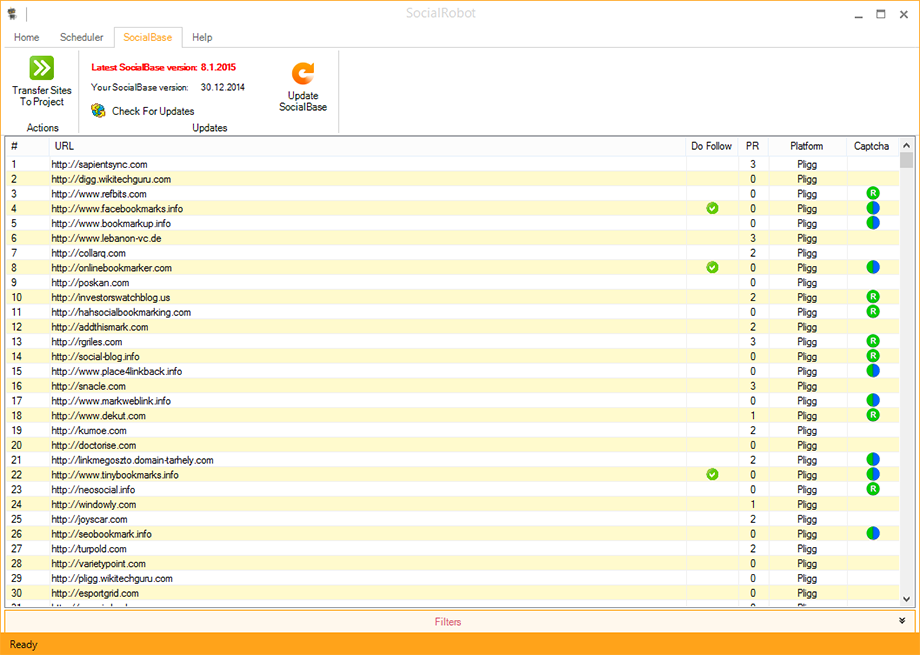
SocialBase is our additional product that contains only working and tested social bookmarking sites. It's updated approximately on a weekly basis and can be accessed directly from SocialRobot in the SocialBase tab. Note that SocialBase is a subscription (more about that HERE). Before you can use SocialBase, you need to activate it in Options / SocialBase with your SocialBase unlock key (as said, SocialBase is additional product and your SocialRobot unlock key won't work to unlock SocialBase).
Once your SocialBase is activated, Latest SocialBase version will display the date of latest SocialBase version available on SocialBase server to download. This will be colored red if you don't have the newest SocialBase or green if you do. Your SocialBase version will display the date of your current downloaded SocialBase version. If there is a newer version available (you can force check by clicking the Check For Updates button), you can download it by clicking Update SocialBase button. Once you have the latest SocialBase, you can transfer SocialBase to any of your projects by clicking the Transfer Sites To Project. You can also apply filters to filter SocialBase sites (described in Sites Manager chapter). The described workflow is how SocialBase is meant to be used: download SocialBase sites (and filter them if needed), then transfer them to a desired project. Once those are in project you can begin applying actions (registration, email confirmation, postin, etc.).
Help

This is where you'll find all information about your license, references to all help resources available and ability to get support.
- Check For Updates - SocialRobot checkes if there is a newer version available on each startup of application. If you want to force check if there are any updates available, use this button.
- License Information - this will present you with information about your license (name, email, unlock key, activation key).
- Enter Unlock Key - if you're running SocialRobot in a Trial mode, this is the place where you enter your unlock key (unless you've already entered it when prompted at SocialRobot startup). You can also enter a different unlock key (sometimes needed in special circumstances)
- Reset License - if you need to reset your license, click this button. This is useful when you want to transfer SocialRobot to a different computer. This way you can deactivate SocialRobot on a current computer and activate it on new one.
- About - about SocialRobot.
- Quick Start Video - a quick start video guide that explains how to properly use SocialRobot. Opens in browser.
- User's Manual - a link to what you're reading right now. Opens in browser.
- Forum - SocialRobot community forum. Opens in browser
- Submit A Ticket - should you have any questions regarding SocialRobot, don't hesitate to open a support ticket. We'll be glad to answer any of your questions. Opens in browser.